Public Folder: Action
The Action page specifies the basic action to perform on public folders. The pages available for selection in the Steps pane adjust based on this selection.
NOTE: Once an action is selected and saved, and the wizard is closed, this page is no longer available and the selection cannot be altered.
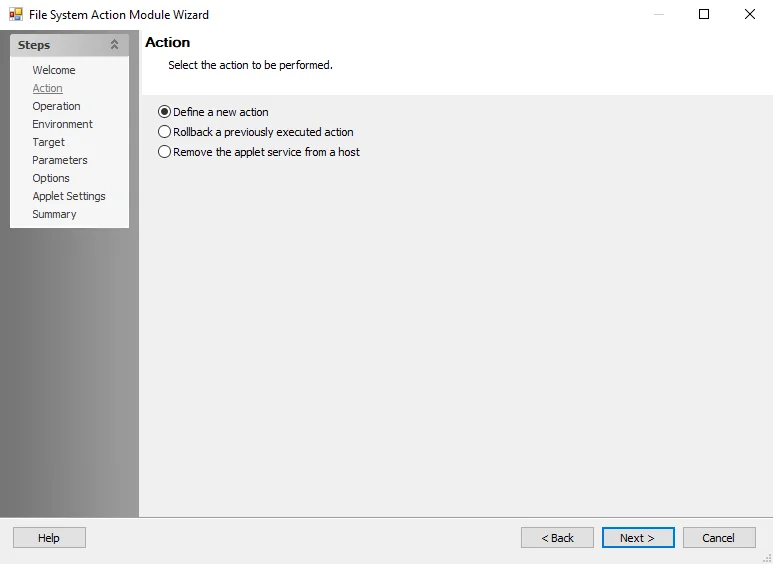
Choose from the following actions:
- Define a new action – Enables the Operation page where the operation on which the action is based is selected
- Rollback a previously executed action – Enables the Prior Actions page where a list of previously executed actions is displayed and a selected action may be rolled back. Not all operations support rollback, and the Support Rollback option must be enabled prior to execution for the action to be eligible for rollback.
Public Folder: Folders
The Folders page identifies which public folders are targeted by this action.
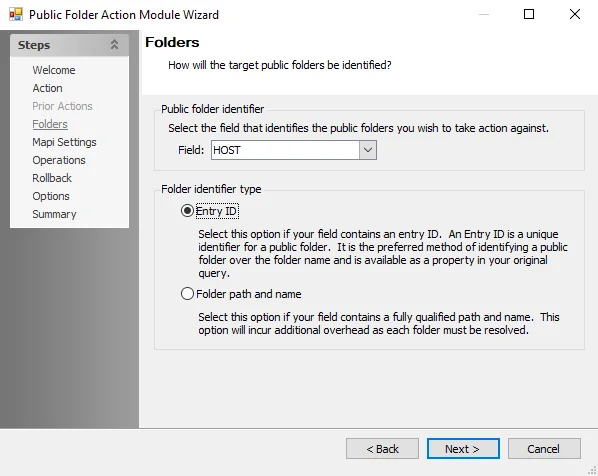
The options on this page are:
-
Public folder identifier – Select a field using the dropdown menu
-
Field – Column names
NOTE: The displayed fields vary depending on the Source Table selected during the creation of the new action
-
-
Folder identifier type – Select a folder type option
- Entry ID – Select this option if the field contains an Entry ID
- Folder path and name – Select this option if the field contains a fully qualified path and name
Public Folder: MAPI Settings
Use the MAPI Settings page to specify the proper MAPI settings.
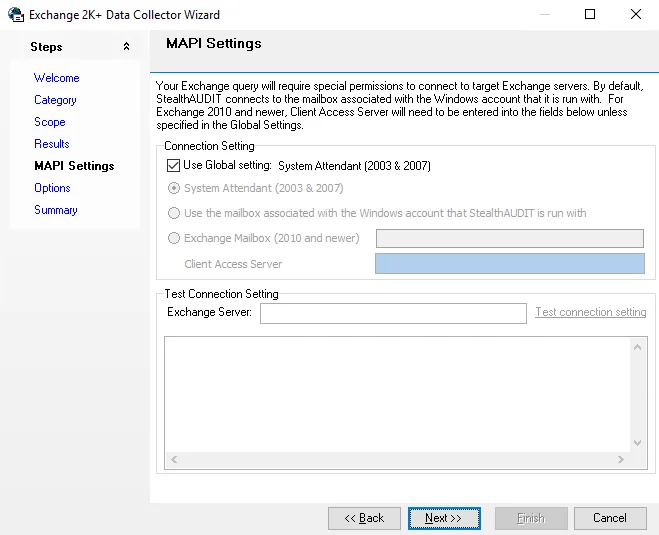
Use the following options to configure the action:
-
Use Global setting – The default setting in the Exchange Global Settings displays
-
System Attendant (2003 & 2007)
-
Use the mailbox associated with the Windows account on which Enterprise Auditor is run
-
Exchange Mailbox (2010 and newer) – If targeting a 2010 Exchange Server, specify the CAS server. This is also where the MAPI setting is selected.
- Client Access Server – Enter the Domain Name in this field
Public Folder: Operations
Use the Operations page to specify the operations to perform as part of the action.
The Add operation drop-down menu lists the operations that can be performed. Each operation opens a corresponding window. Operations include:
- Rename – See the Rename Folder Window topic for additional information
- Change permissions – See the Change Permissions Window topic for additional information
- Custom attributes – See the Custom Attributes Window topic for additional information
- Replicas – See the Replicas Window topic for additional information
- Limits – See the Limits Window topic for additional information
- Delete – See the Delete Folder Window topic for additional information
The buttons to the right of the drop-down control the operations in the field:
- Edit – Allows you to alter operation settings
- Add – Places selected operation one step above its current position
- Down – Places selected operation one step below its current position
- Delete – Removes a selected operation
Rename Folder Window
Use the Rename Folder window to rename selected folders. It is a wizard page for the Rename operation.

Rename folders using the following options:
-
Select a field from the dropdown menu and click Add to add it to the list below
NOTE: The available fields vary based on the source table.
-
New name – Enter the name to replace an existing folder name
Change Permissions Window
Use the Change Permissions window to change the permissions. It is a wizard page for the Change permissions operation.
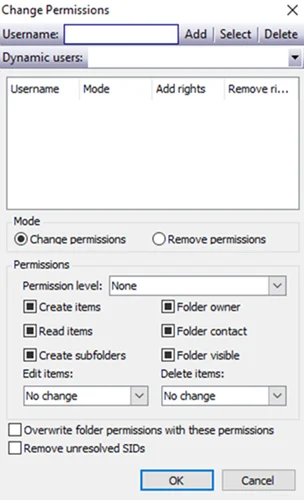
Change permissions using the following options:
-
Username – Select a user or create a list of users to edit permissions for
- To add a user, type in the field to search for a user, select it, and click Add
- Click Select to open a list with usernames to select from
- To delete a user, select an added user and click Delete
-
Dynamic users – Select a user using the dropdown menu
-
Mode – Select whether to change or remove permissions
-
Permissions – Determine Permission level and assign permissions to the user
-
Permission level – Use the drop-down menu to select a permission level from the following:
- Reviewer
- Contributor
- Nonediting Author
- Author
- Editor
- Publishing Author
- Publishing Editor
- Owner
- Custom
-
Select the checkbox to assign a permission to any of the following:
- Create items – User can create items
- Read items – User can read items
- Create Subfolders – User can create subfolders
- Folder owner – User can view and move the public folder, create subfolders, and set permissions for the folder, but cannot read, edit, delete, or create items
- Folder contact – Set user as the contact for the specified public folder
- Folder visible – User can view the specified public folder but cannot read or edit the items within
NOTE: Different permissions become automatically selected based on which permission level is selected. To override this default, select the checkbox of the unwanted permission to deselect it. If a desired checkbox is blocked by a black square, click the square to unblock the checkbox. The checkbox can then be selected or unselected.
-
Edit items – Use the drop-down menu to determine user editing permissions from the following:
- No change
- None
- Allow own
- Deny any
- Own only
- All
-
Delete items – Use the drop-down menu to determine user deletion permissions from the following:
- No change
- None
- Allow own
- Deny any
- Own only
- All
-
-
Overwrite folder permissions with these conditions
-
Remove unresolved SIDs
Custom Attributes Window
Use the Custom Attributes window to select custom attributes. It is a wizard page for the Custom Attributes operation.
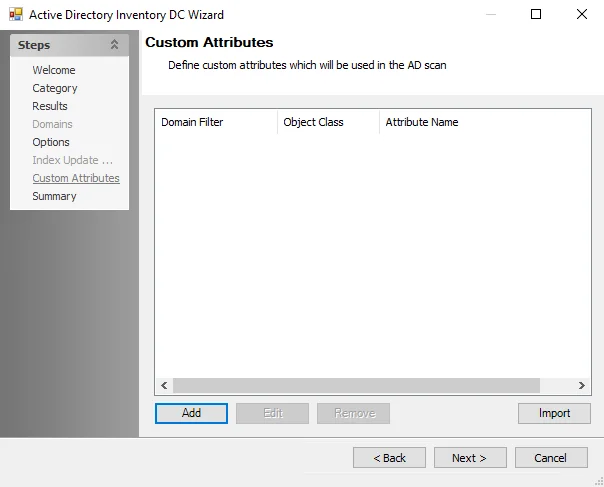
Select attributes using the following options:
-
Select a checkbox to set any custom attribute list
-
Select a Field from the dropdown list and click Add to add the field to the custom attribute
NOTE: Multiple fields may be added to a custom attribute. Fields added to a custom attribute can be modified or deleted manually.
Replicas Window
Use the Replicas window to replicate servers. It is a wizard page for the Replicas operation.

Replicate servers using the following options:
- Select a server from the dropdown menu and click Add. The servers listed will be replicated.
- Select a server from the list and click Delete to remove it from the list of replicated servers
- Select the Remove last replica option to delete the replica created when the action was last run
Limits Window
Use the Limits window to select limits to the action. It is a wizard page for the Limits operation.
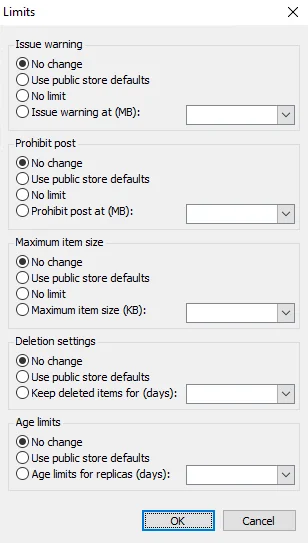
Use the options to select any changes for the categories. If applicable, use the dropdown to select desired values related to the corresponding option.
- Issue warning
- Prohibit post
- Maximum Item Size
- Deletion settings
- Age limits
Delete Folder Window
Use the Delete Folder window to select deletion settings for the action. It is a wizard page for the Delete operation.
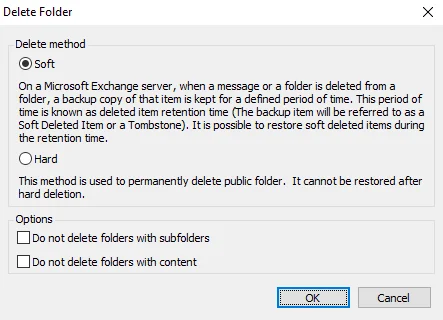
Select deletion settings using the following options:
-
Select the delete method
- Soft – Delete the folder but retain a backup copy for a defined period of time
- Hard – Delete the folder permanently, without retaining a backup
-
Optionally, select a checkbox to apply any exception
- Do not delete folders with subfolders
- Do not delete folders with content
Public Folder: Options
Use the Options page to edit the thread settings.
CAUTION: Increasing the thread count increases the processing load on the servers.
Use the following options to configure the operations:
- Number of threads per server – Adjust the number of threads the server processes at a time. The default is set to one.
- Number of servers to process in parallel – Adjust the number of servers to process at a time. The default is set to two.
PublicFolder Action Module
The Public Folder action module allows users to make bulk changes to selected Microsoft Exchange public folders by adding, changing, or removing folders and permissions from the environment. Use the Pubic Folder Action Module Wizard to choose the data table column that identifies the folders and to configure the operations performed against the selected folders.
Prior to configuring the Pubic Folder Action Module Wizard, scope the source data table to ensure the actions apply only to the desired folders.
CAUTION: Be careful when using this action module. Make sure that only the changes required are applied and only to those target folders desired. Always verify the data prior to execution of any action.
RECOMMENDED: Although rollbacks for some actions are available, having to use one should be avoided
Configuration
The Public Folder action module is configured through the Public Folder Action Module Wizard, which contains the following wizard pages:
- Welcome
- Public Folder: Action
- Public Folder: Prior Actions
- Public Folder: Folders
- Public Folder: MAPI Settings
- Public Folder: Operations
- Public Folder: Rollback
- Public Folder: Options
- Public Folder: Summary
The Welcome page gives an overview of the action module. The navigation pane contains links to the pages in the wizard. Review the introductory and caution information about the Public Folder Action Module before proceeding.
To proceed, click Next or use the Steps navigation pane to open another page in the wizard.
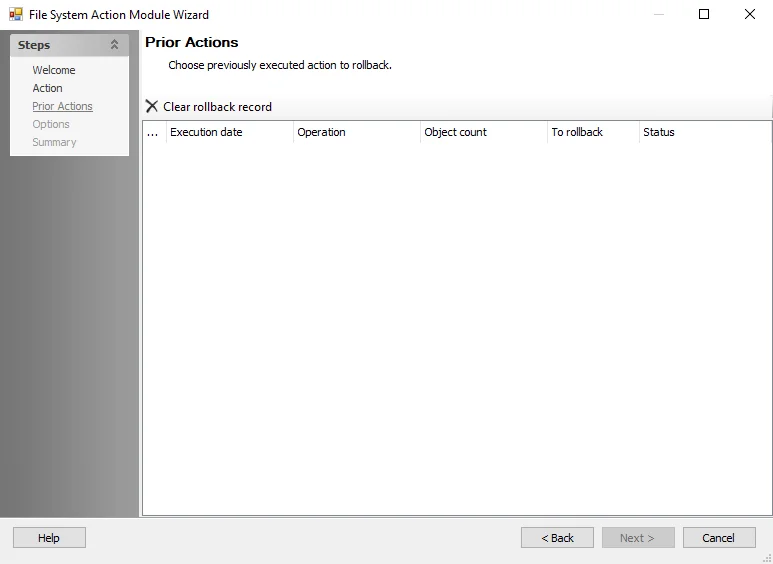
Public Folder: Prior Actions
The Prior Actions page selects previously executed actions for rollback. It is a wizard page when Rollback a previously executed action is selected on the Action page.
NOTE: Once an action is selected and saved, and the wizard is closed, this page is no longer available and the selection cannot be altered.
The options on this page are:
- Select a previously executed action (if available) to rollback
- Click Clear rollback record to remove all actions from the list
Public Folder: Rollback
Use the Rollback page to enable rollback capabilities for the action. If rollback isn’t selected at this step, the applied operations cannot be rolled back after execution of the action module.

The options on this page are:
- Support rollback – Select to enable rollback of this action
- Add additional comments to be saved with this rollback – Optionally, enter a brief description to identify this rollback
Public Folder: Summary
The Summary page summarizes the configuration of the action.
Click Finish to save configuration changes. If no changes were made, it is a best practice to click Cancel to close the Public Folder Action Module Wizard to ensure that no accidental clicks are saved.