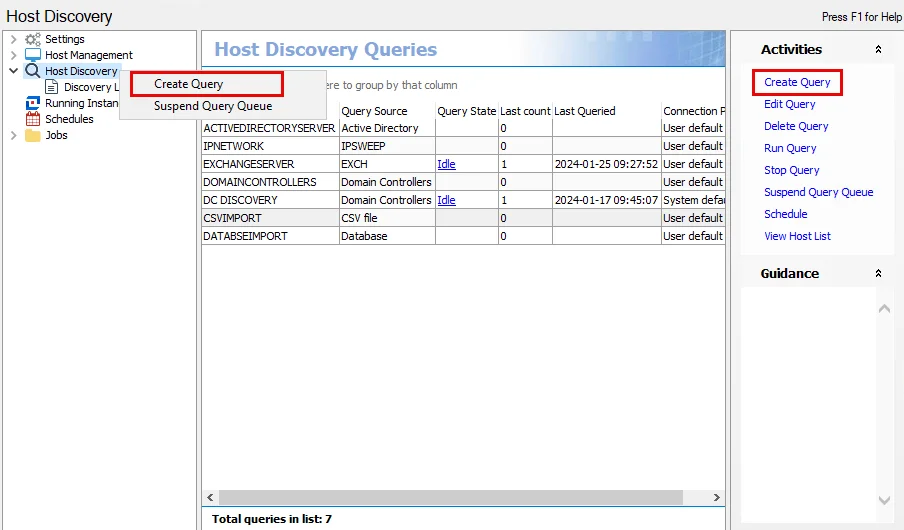
Host Discovery Queries Activities Pane
The Activities pane provides several options for managing Host Discovery queries.

The options are:
-
Create Query – Opens the Host Discovery Wizard to create a new query
-
Edit Query – Opens the Host Discovery Wizard with the selected query’s configuration
-
Delete Query – Deletes the selected query and its generated host list
- A confirmation window displays. Click Yes to complete the deletion
-
Run Query – Begins an immediate execution of the selected query
-
Stop Query – Stops the selected query which is currently running
- No action occurs if the query is Idle
-
Suspend Query Queue – Removes the selected query from a scheduled queue
- The Activities pane listing changes to Resume Query Queue. Click again to resume scheduled queue.
-
Schedule – Opens the Schedule wizard to schedule query execution
- See the Schedule topic for additional information on the Schedule wizard
-
View Host List – Opens the Host Management node directly to the selected query’s generated host list
These options are also available through a pop-up menu accessed by right-clicking on a query. Create Query and Suspend Query Queue are additionally available through a pop-up menu accessed by right-clicking on the Host Discovery node.
Discovery Log
The Host Discovery > Discovery Log node lists host discovery logs. These logs house transactions that transpire during the running of host discovery and host inventory tasks.
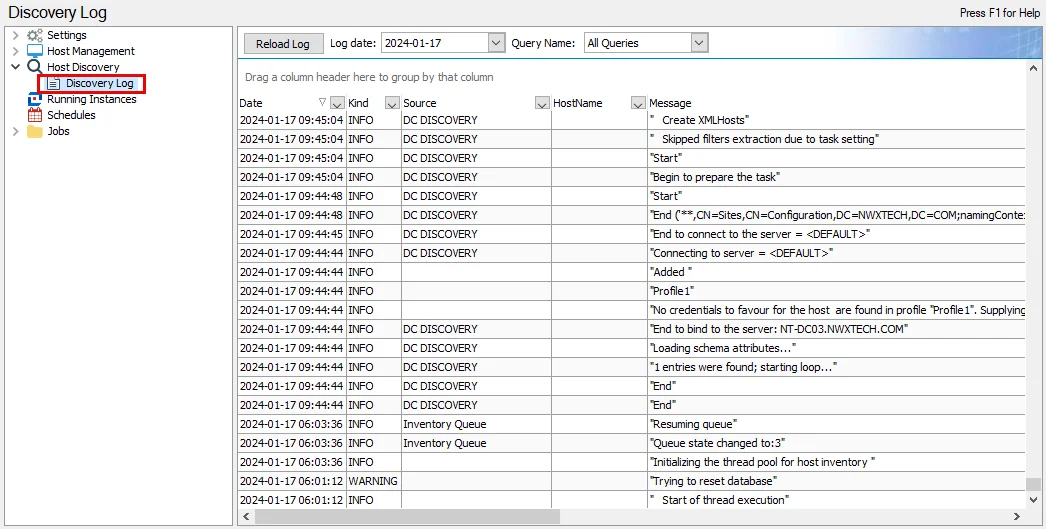
The Discovery Log logging level is configured within the Settings > Host Discovery node. See the Host Discovery topic for additional information.
The following options are above the data grid:
- Reload Log – Refresh the log data for the selected Log date and Query Name
- Log date – Select the desired Log date from the drop-down menu to view transactions
- Query Name – The default selection is All Queries. To narrow the data to a desired query, select a query name from the drop-down menu.
The data grid contains the following columns:
- Date – Date timestamp of transaction
- Kind – Type of transaction recorded (Error, Warning, Info, Debug), controlled by the configured logging level
- Source – Selectively used, the source value reflects the core component responsible for producing the message
- HostName – Name of the targeted host where the transaction occurred
- Message – Log transaction message
Host Discovery Node
Use the Host Discovery node to discover hosts to audit. Host Discovery queries are created in the Host Discovery node to discover hosts within the targeted environment that match the desired criteria (for example, all domain controllers for Active Directory auditing).
The Host Discovery queries view displays a list of previously configured queries, opens the Host Discovery Wizard to create new queries, and is where host inventory process can be automated. The Host Discovery node houses the Discovery Log. The Settings > Host Discovery node contains the global settings that affect discovery queries. See the Host Discovery topic for additional information.
The Discovery node has four main panes:
Host Discovery Queries
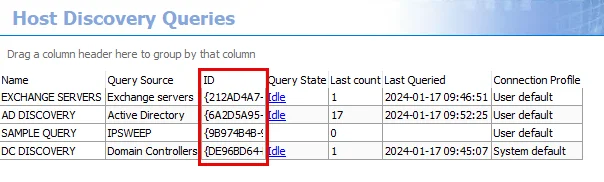
The Host Discovery Queries Pane contains a list of previously-configured queries.
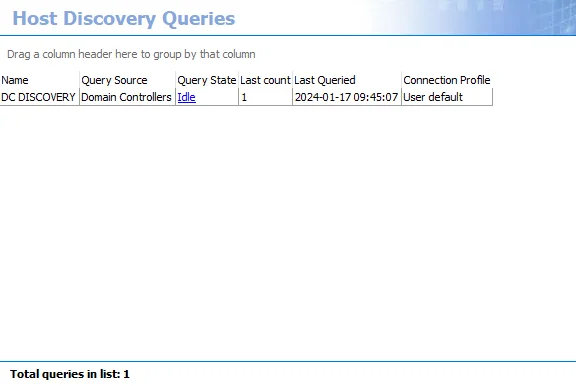
The list of previously configured queries is provided in a table format with the following columns:
-
Name – Displays the name assigned to the query during creation
-
Query Source – Identifies where the query searches for hosts
-
Query State – Displays the query’s current status (active or idle)
-
Last count – Identifies the number of hosts found from the last scan
-
Last Queried – Displays the date and time stamp for the last running of the query
-
Connection Profile – Identifies the Connection Profile assigned to the query for access to the Query Source
-
ID – GUID of the query task
-
SANode – Name of the Enterprise Auditor Console server
-
Snapshot mode – Identifies the type of discovery query:
- Cumulative – Grows the host list by appending newly discovered hosts with each query execution
- Snapshot – Only shows host found during the most recent query execution
NOTE: The Snapshot mode is configured on the Options page of the Host Discovery Wizard.
View Hidden Columns
Follow the steps to view the hidden columns in the table:
Step 1 – Right-click a header in the table, which opens a context menu.
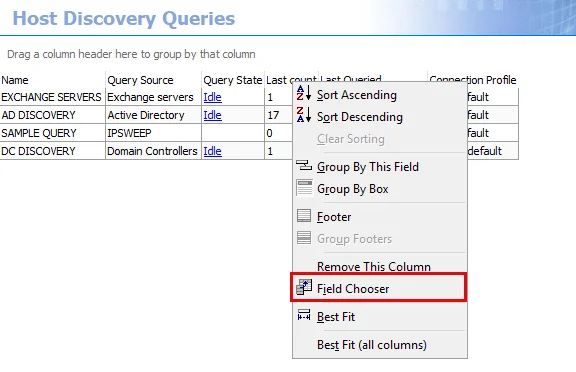
Step 2 – Select Field Chooser, which opens the Customization window.

Step 3 – Select the Columns tab.
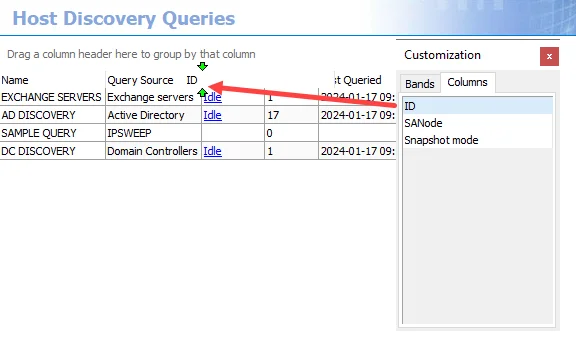
Step 4 – Drag and drop the desired column between any header of the table.
The header is now present in the table.
Query an Active Directory server (Discover Domain Controllers)
Follow the steps to create a Host Discovery query using the Query an Active Directory server (Discover Domain Controllers) source option. This option scans the default domain controller or a specified server but is scoped to return only machines that are domain controllers.
Step 1 – Open the Host Discovery Wizard. On the Source page, select the Query an Active Directory server (Discover Domain Controllers) option. Click Next.
Step 2 – On the Query page, name the query and select the credentials used to access the source.
-
Query Name – Provide a unique descriptive name for this query by typing over the
NEWQUERYdefault name. Two queries cannot have the same name. If you use an existing name, a number is automatically appended to the query name, for exampleNEWQUERYbecomesNEWQUERY1. -
Credentials – Select a Connection Profile. These credentials require the appropriate permissions for querying the source:
- Default credentials (credentials the application is run with) – Applies the credentials used to launch the Enterprise Auditor application
- Credentials in my default connection profile – Applies the default Connection Profile configured at the global level (Settings > Connection)
- Credentials in this connection profile – Use the dropdown list to select a Connection Profile from those preconfigured at the global level (Settings > Connection)
See the Connection topic for additional information on Connection Profiles.
Click Next to continue.
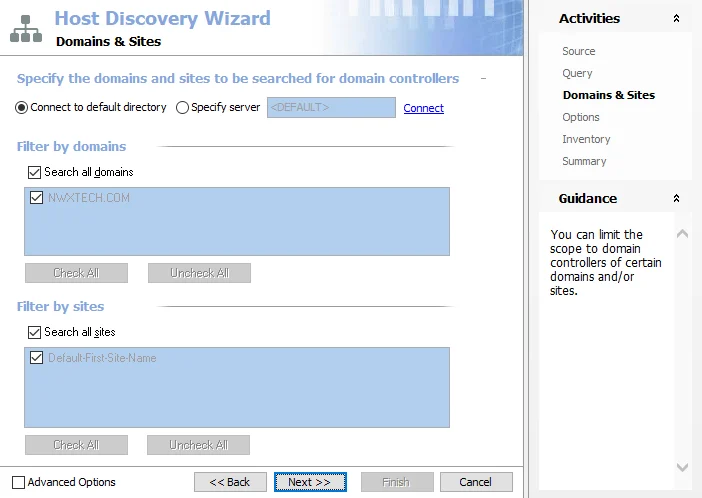
Step 3 – The Domains & Sites page is scoped to return all domain controllers in the targeted domains and sites. By default, all domains and sites are selected. If desired, scope to target specific domains and sites.
-
Connection – Select the radio button to specify the server to be connected to and searched:
- Connect to default directory – Selects a default domain controller from the domain in which the Enterprise Auditor Console server resides
- Specify server – Specify a particular server or domain controller. Type the server name in the textbox. Click Connect to confirm the connection to the specified server and populate the domains and sites choices.
-
Filter by domains – Lists discovered domains
- Search all domains – The default option. To narrow the scope to specific domains, deselect this option to enable the selection box.
- Exclude domain – Deselect the checkbox for a domain in the list to exclude it from the scope. The Check All and Uncheck All buttons are enabled when scoping by domain.
-
Filter by sites – Lists discovered sites
- Search all sites – The default option. To narrow the scope to specific sites, deselect this option to enable the Selection box.
- Exclude site – Deselect the checkbox for a site in the list to exclude it from the scope. The Check All and Uncheck All buttons are enabled when scoping by site.
Click Next to continue.
Step 4 – On the Options page, configure the query options as required.
-
Run the query when jobs that reference it are run – Select this option to automatically execute the Host Discovery query prior to executing a job that has the host list generated by this query assigned. This ensures any new hosts have been discovered and are available for auditing.
RECOMMENDED: Use this setting only for host lists tied to specific jobs that require up-to-date host lists.
-
Query Result Retention – Select how to maintain the host list generated by this discovery query:
- Yes, grow the host list by appending newly discovered hosts – The host list includes every host the query has ever discovered
- No, only show hosts that were found during the most recent run – The host list generated by this query includes only hosts found in the most recent query execution. This option removes hosts from the generated host list, but does not remove hosts from the Host Master Table.
Click Next to continue.
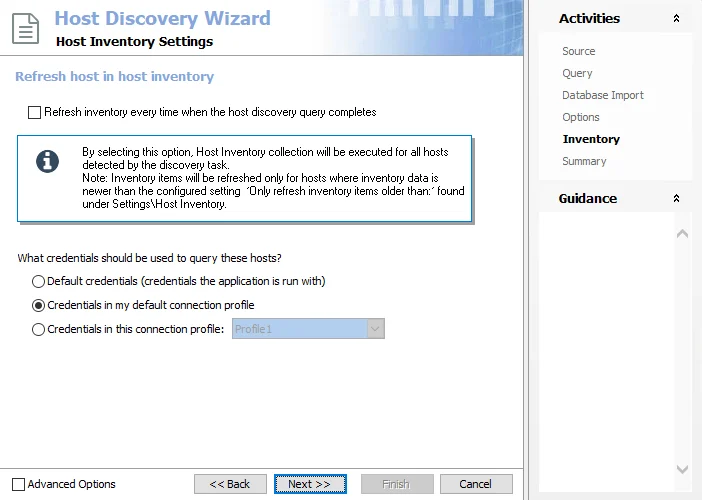
Step 5 – On the Inventory page, the host inventory process can be automatically included with the discovery query.
-
Refresh inventory every time when the host discovery query completes – Automates the host inventory process and is dependent on the Settings > Host Inventory node configuration for the age of previously inventoried records. Leaving this option deselected applies the global settings for host inventory.
-
Credentials – Select a Connection Profile. These credentials require the appropriate permissions for gathering inventory information from the discovered hosts:
- Default credentials (credentials the application is run with) – Applies the credentials used to launch the Enterprise Auditor application
- Credentials in my default connection profile – Applies the default Connection Profile configured at the global level (Settings > Connection)
- Credentials in this connection profile – Use the dropdown list to select a Connection Profile from those preconfigured at the global level (Settings > Connection)
See the Connection topic for additional information on Connection Profiles.
Click Next to continue.
Step 6 – The Summary page displays all the selected query configuration settings. To make changes, click Back to navigate to the relevant wizard page. Click Finish to complete the configuration process.

Step 7 – A Confirm dialog box opens. Click Yes to run the query now or No to run the query at another time.
Both options close the Host Discovery Wizard and return to the Host Discovery Queries view on the Host Discovery node. If Yes is selected, the Query State indicates the running query.
Query an Active Directory Server (Discover Exchange servers)
Follow the steps to create a Host Discovery query using the Query an Active Directory server (Discover Exchange servers) source option. This option scans the default domain controller or a specified server but is scoped to return only computer objects residing in the configuration container for Exchange servers.
Step 1 – Open the Host Discovery Wizard. On the Source Page, select the Query an Active Directory server (Discover Exchange servers) option. Click Next.
Step 2 – On the Query page, name the query and select the credentials used to access the source.
-
Query Name – Provide a unique descriptive name for this query by typing over the
NEWQUERYdefault name. Two queries cannot have the same name. If you use an existing name, a number is automatically appended to the query name, for exampleNEWQUERYbecomesNEWQUERY1. -
Credentials – Select a Connection Profile. These credentials require the appropriate permissions for querying the source:
- Default credentials (credentials the application is run with) – Applies the credentials used to launch the Enterprise Auditor application
- Credentials in my default connection profile – Applies the default Connection Profile configured at the global level (Settings > Connection)
- Credentials in this connection profile – Use the dropdown list to select a Connection Profile from those preconfigured at the global level (Settings > Connection)
See the Connection topic for additional information on Connection Profiles.
Click Next to continue.
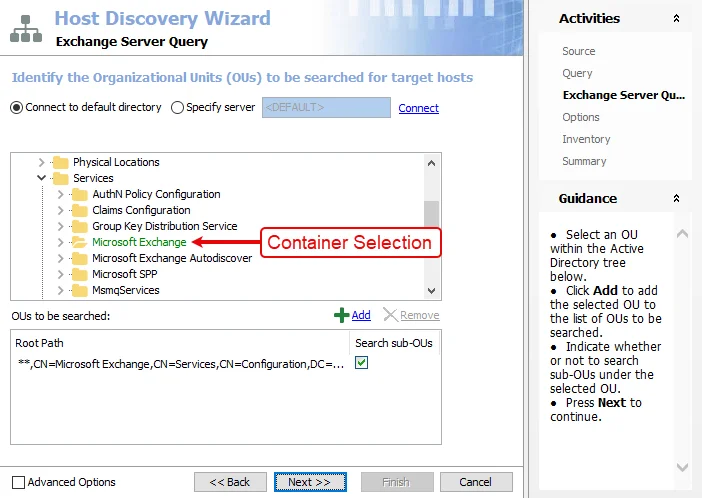
Step 3 – The Exchange Server Query page is scoped to the default Microsoft container where all Exchange servers are housed.
Leave this page unchanged. If you must modify this page, see the Query an Active Directory Server (General) topic for instructions. Click Next.
Step 4 – On the Options page, configure the query options as required.
-
Run the query when jobs that reference it are run – Select this option to automatically execute the Host Discovery query prior to executing a job that has the host list generated by this query assigned. This ensures any new hosts have been discovered and are available for auditing.
RECOMMENDED: Use this setting only for host lists tied to specific jobs that require up-to-date host lists.
-
Query Result Retention – Select how to maintain the host list generated by this discovery query:
- Yes, grow the host list by appending newly discovered hosts – The host list includes every host the query has ever discovered
- No, only show hosts that were found during the most recent run – The host list generated by this query includes only hosts found in the most recent query execution. This option removes hosts from the generated host list, but does not remove hosts from the Host Master Table.
Click Next to continue.
Step 5 – On the Inventory page, the host inventory process can be automatically included with the discovery query.
-
Refresh inventory every time when the host discovery query completes – Automates the host inventory process and is dependent on the Settings > Host Inventory node configuration for the age of previously inventoried records. Leaving this option deselected applies the global settings for host inventory.
-
Credentials – Select a Connection Profile. These credentials require the appropriate permissions for gathering inventory information from the discovered hosts:
- Default credentials (credentials the application is run with) – Applies the credentials used to launch the Enterprise Auditor application
- Credentials in my default connection profile – Applies the default Connection Profile configured at the global level (Settings > Connection)
- Credentials in this connection profile – Use the dropdown list to select a Connection Profile from those preconfigured at the global level (Settings > Connection)
See the Connection topic for additional information on Connection Profiles.
Click Next to continue.
Step 6 – The Summary page displays all the selected query configuration settings. To make changes, click Back to navigate to the relevant wizard page. Click Finish to complete the configuration process.
Step 7 – A Confirm dialog box opens. Click Yes to run the query now or No to run the query at another time.
Both options close the Host Discovery Wizard and return to the Host Discovery Queries view on the Host Discovery node. If Yes is selected, the Query State indicates the running query.
Query an Active Directory Server (General)
Follow the steps to create a Host Discovery query using the Query an Active Directory server (General) source option. This option scans the default domain controller or a specified server for all computer objects. The query can be scoped to only return computer objects in specified containers or individual computer objects. See Step 3 for additional information.
Step 1 – Open the Host Discovery Wizard. On the Source page, select the Query an Active Directory server (General) option. Click Next.
Step 2 – On the Query page, name the query and select the credentials used to access the source.
-
Query Name – Provide a unique descriptive name for this query by typing over the
NEWQUERYdefault name. Two queries cannot have the same name. If you use an existing name, a number is automatically appended to the query name, for exampleNEWQUERYbecomesNEWQUERY1. -
Credentials – Select a Connection Profile. These credentials require the appropriate permissions for querying the source:
- Default credentials (credentials the application is run with) – Applies the credentials used to launch the Enterprise Auditor application
- Credentials in my default connection profile – Applies the default Connection Profile configured at the global level (Settings > Connection)
- Credentials in this connection profile – Use the dropdown list to select a Connection Profile from those preconfigured at the global level (Settings > Connection)
See the Connection topic for additional information on Connection Profiles.
Click Next to continue.
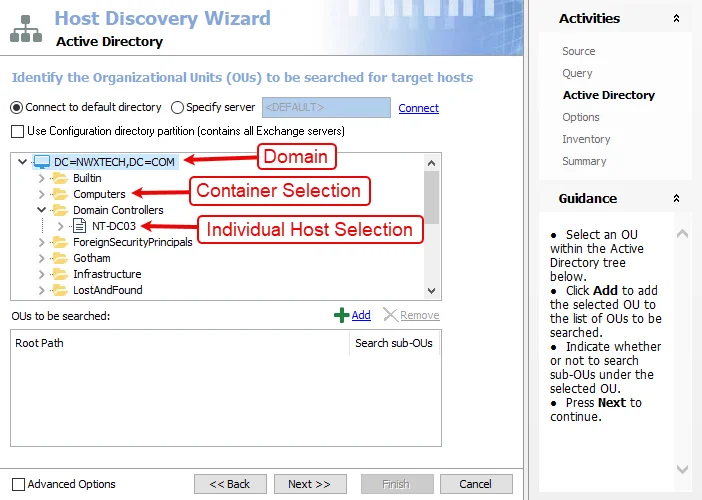
Step 3 – On the Active Directory page, identify the organizational units (OUs) to scan.
RECOMMENDED: Scope the query when using this source option.
-
Connection – Select the server to connect to and search for computer objects using the radio buttons:
- Connect to default directory – Selects a default domain controller from the domain in which the Enterprise Auditor Console server resides
- Specify server – Allows you to specify a particular server or domain controller. Type the server name in the textbox. Click Connect to confirm the connection to the specified server and populate the OU choices.
-
Use Configuration directory partition (contains all Exchange servers) – If selected, the Configuration directory opens in the Selection box
-
Selection box – Expand the domain to select containers and individual hosts. Click Add to include the selected container or host in the OUs to be searched box.
-
OUs to be searched box – Displays the selected OUs. Use the buttons at the top of the box to edit the list:
- Add – Adds the selection from the Selection Box into the list
- Remove – Removes the selected OU from the list
-
Search sub-OUs – This checkbox in the OUs to be searched box indicates scan depth for the selected OU
Click Next to continue.
Step 4 – On the Options page, configure the query options as required.
-
Run the query when jobs that reference it are run – Select this option to automatically execute the Host Discovery query prior to executing a job that has the host list generated by this query assigned. This ensures any new hosts have been discovered and are available for auditing.
RECOMMENDED: Use this setting only for host lists tied to specific jobs that require up-to-date host lists.
-
Query Result Retention – Select how to maintain the host list generated by this discovery query:
- Yes, grow the host list by appending newly discovered hosts – The host list includes every host the query has ever discovered
- No, only show hosts that were found during the most recent run – The host list generated by this query includes only hosts found in the most recent query execution. This option removes hosts from the generated host list, but does not remove hosts from the Host Master Table.
Click Next to continue.
Step 5 – On the Inventory page, the host inventory process can be automatically included with the discovery query.
-
Refresh inventory every time when the host discovery query completes – Automates the host inventory process and is dependent on the Settings > Host Inventory node configuration for the age of previously inventoried records. Leaving this option deselected applies the global settings for host inventory.
-
Credentials – Select a Connection Profile. These credentials require the appropriate permissions for gathering inventory information from the discovered hosts:
- Default credentials (credentials the application is run with) – Applies the credentials used to launch the Enterprise Auditor application
- Credentials in my default connection profile – Applies the default Connection Profile configured at the global level (Settings > Connection)
- Credentials in this connection profile – Use the dropdown list to select a Connection Profile from those preconfigured at the global level (Settings > Connection)
See the Connection topic for additional information on Connection Profiles.
Click Next to continue.
Step 6 – The Summary page displays all the selected query configuration settings. To make changes, click Back to navigate to the relevant wizard page. Click Finish to complete the configuration process.
Step 7 – A Confirm dialog box opens. Click Yes to run the query now or No to run the query at another time.
Both options close the Host Discovery Wizard and return to the Host Discovery Queries view on the Host Discovery node. If Yes is selected, the Query State indicates the running query.
Import From a Local CSV File
Follow the steps to create a Host Discovery query using the Import from a CSV file source option.
CAUTION: Each time a query refresh occurs for a query with an import option set as the source, it re-imports the host list. Therefore, deleting, renaming, or moving the import source file causes the query to fail.
Step 1 – Open the Host Discovery Wizard. On the Source page, select the Import from a CSV file option on the Source page. Click Next.
Step 2 – On the Query page, name the query and select the credentials used to access the source.
NOTE: The source in this case is the Enterprise Auditor Console server.
-
Query Name – Provide a unique descriptive name for this query by typing over the
NEWQUERYdefault name. Two queries cannot have the same name. If you use an existing name, a number is automatically appended to the query name, for exampleNEWQUERYbecomesNEWQUERY1. -
Credentials – Select a Connection Profile. These credentials require the appropriate permissions for querying the source:
- Default credentials (credentials the application is run with) – Applies the credentials used to launch the Enterprise Auditor application
- Credentials in my default connection profile – Applies the default Connection Profile configured at the global level (Settings > Connection)
- Credentials in this connection profile – Use the dropdown list to select a Connection Profile from those preconfigured at the global level (Settings > Connection)
See the Connection topic for additional information on Connection Profiles.
Click Next to continue.
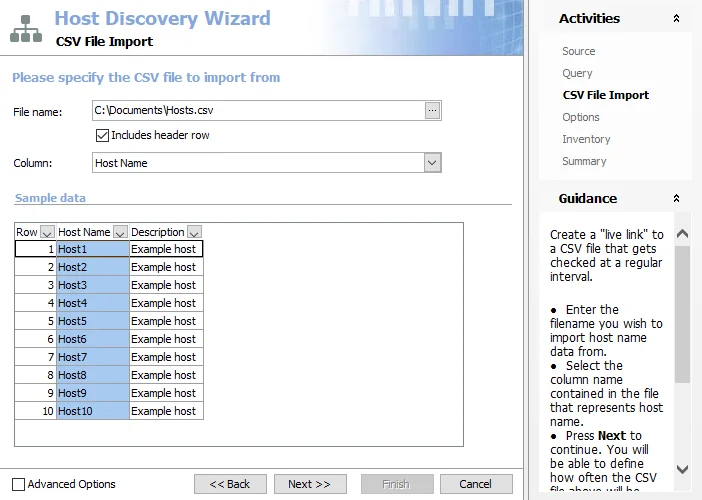
Step 3 – On the CSV File Import page, identify the CSV file to import and the column from within the file where the host names are located:
- File name – Identify the CSV file with the full file path. Use the ellipsis (…) to open a browser window.
- Includes header row – If the first row of the CSV file is a header row, select this option to remove it from the list of hosts to be imported
- Column – The drop-down menu is populated from the selected CSV file. Select the column containing the host names. The selection is highlighted in the Sample data box.
- Sample data box – Displays a preview of the selected CSV file
Click Next to continue.
Step 4 – On the Options page, configure the query options as required.
-
Run the query when jobs that reference it are run – Select this option to automatically execute the Host Discovery query prior to executing a job that has the host list generated by this query assigned. This ensures any new hosts have been discovered and are available for auditing.
RECOMMENDED: Use this setting only for host lists tied to specific jobs that require up-to-date host lists.
-
Query Result Retention – Select how to maintain the host list generated by this discovery query:
- Yes, grow the host list by appending newly discovered hosts – The host list includes every host the query has ever discovered
- No, only show hosts that were found during the most recent run – The host list generated by this query includes only hosts found in the most recent query execution. This option removes hosts from the generated host list, but does not remove hosts from the Host Master Table.
Click Next to continue.
Step 5 – On the Inventory page, the host inventory process can be automatically included with the discovery query.
-
Refresh inventory every time when the host discovery query completes – Automates the host inventory process and is dependent on the Settings > Host Inventory node configuration for the age of previously inventoried records. Leaving this option deselected applies the global settings for host inventory.
-
Credentials – Select a Connection Profile. These credentials require the appropriate permissions for gathering inventory information from the discovered hosts:
- Default credentials (credentials the application is run with) – Applies the credentials used to launch the Enterprise Auditor application
- Credentials in my default connection profile – Applies the default Connection Profile configured at the global level (Settings > Connection)
- Credentials in this connection profile – Use the dropdown list to select a Connection Profile from those preconfigured at the global level (Settings > Connection)
See the Connection topic for additional information on Connection Profiles.
Click Next to continue.
Step 6 – The Summary page displays all the selected query configuration settings. To make changes, click Back to navigate to the relevant wizard page. Click Finish to complete the configuration process.
Step 7 – A Confirm dialog box opens. Click Yes to run the query now or No to run the query at another time.
Both options close the Host Discovery Wizard and return to the Host Discovery Queries view on the Host Discovery node. If Yes is selected, the Query State indicates the running query.
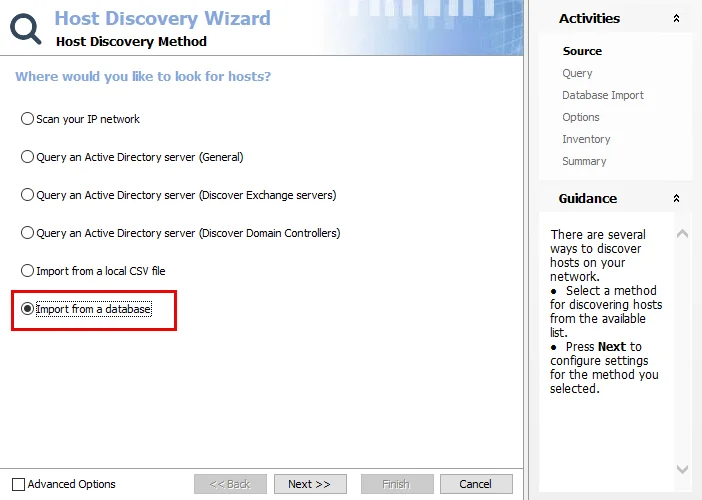
Import From a Database
Follow the steps to create a Host Discovery query using the Import from a database source option.
CAUTION: Each time a query refresh occurs for a query with an import option set as the source, it re-imports the host list. Therefore, deleting, renaming, or moving the import source file causes the query to fail.
Step 1 – Open the Host Discovery Wizard. On the Source page, select the Import from a database option. Click Next.
Step 2 – On the Query page, name the query and select the credentials used to access the source.
-
Query Name – Provide a unique descriptive name for this query by typing over the
NEWQUERYdefault name. Two queries cannot have the same name. If you use an existing name, a number is automatically appended to the query name, for exampleNEWQUERYbecomesNEWQUERY1. -
Credentials – Select a Connection Profile. These credentials require the appropriate permissions for querying the source:
- Default credentials (credentials the application is run with) – Applies the credentials used to launch the Enterprise Auditor application
- Credentials in my default connection profile – Applies the default Connection Profile configured at the global level (Settings > Connection)
- Credentials in this connection profile – Use the dropdown list to select a Connection Profile from those preconfigured at the global level (Settings > Connection)
See the Connection topic for additional information on Connection Profiles.
Click Next to continue.
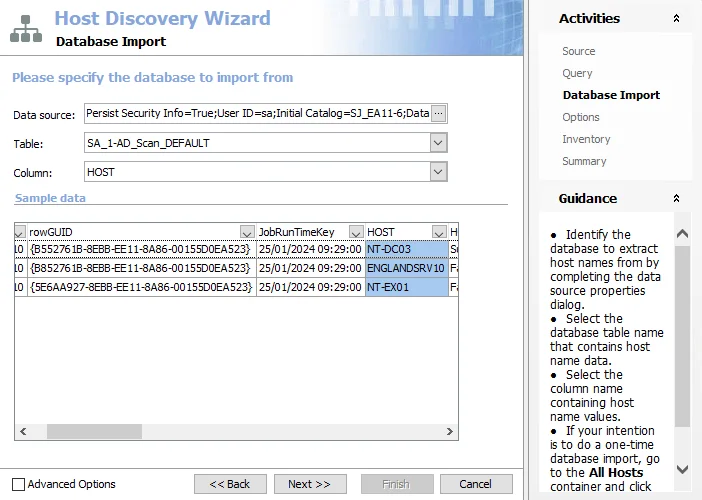
Step 3 – On the Database Import page, identify the database, table, and column where the host names are located:
-
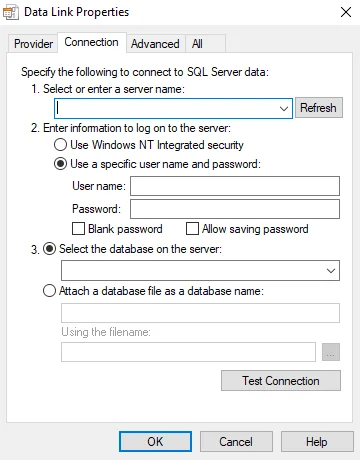
Data source – Identify the database. Click the ellipsis (…) to open the Data Link Properties window. Then provide the required information on the Connection tab.
-
Server name – Use the drop-down menu to select the server. The Refresh button refreshes the list of available servers.
-
Credentials – Select the credentials to use to log on to the server:
- Use Windows NT Integrated security – This option applies the credentials used to run the Enterprise Auditor application
- Use a specific user name and password – Provide the user name and password and select the Allow saving password option
- If selected, the Blank password option indicates that no password is required

-
Click Test Connection to confirm a connection has been established. Click OK on the confirmation window.
-
Database – Select the Select the database on the server option and use the drop-down menu to select the database
-
The other tabs in the Data Link Properties window should not be modified
- Provider tab – The database connector, dictated by the source of the data and the data sources that are available on the Enterprise Auditor Console server. This is set by default to the Microsoft OLE DB Provider for SQL Server.
- Advanced tab – Allows modifications of the connection timeout to the database server in case the server is slow or far away
- All tab – Do not modify this tab
-
Click OK to close the Data Link Properties window
-
-
Table – Use the drop-down menu to select a table from the database
-
Column – Use the drop-down menu to select the column where the host names are located. The selection is highlighted in the Sample data box.
-
Sample data Box – Displays a preview of the selected database table
Click Next to continue.
Step 4 – On the Options page, configure the query options as required.
-
Run the query when jobs that reference it are run – Select this option to automatically execute the Host Discovery query prior to executing a job that has the host list generated by this query assigned. This ensures any new hosts have been discovered and are available for auditing.
RECOMMENDED: Use this setting only for host lists tied to specific jobs that require up-to-date host lists.
-
Query Result Retention – Select how to maintain the host list generated by this discovery query:
- Yes, grow the host list by appending newly discovered hosts – The host list includes every host the query has ever discovered
- No, only show hosts that were found during the most recent run – The host list generated by this query includes only hosts found in the most recent query execution. This option removes hosts from the generated host list, but does not remove hosts from the Host Master Table.
Click Next to continue.
Step 5 – On the Inventory page, the host inventory process can be automatically included with the discovery query.
-
Refresh inventory every time when the host discovery query completes – Automates the host inventory process and is dependent on the Settings > Host Inventory node configuration for the age of previously inventoried records. Leaving this option deselected applies the global settings for host inventory.
-
Credentials – Select a Connection Profile. These credentials require the appropriate permissions for gathering inventory information from the discovered hosts:
- Default credentials (credentials the application is run with) – Applies the credentials used to launch the Enterprise Auditor application
- Credentials in my default connection profile – Applies the default Connection Profile configured at the global level (Settings > Connection)
- Credentials in this connection profile – Use the dropdown list to select a Connection Profile from those preconfigured at the global level (Settings > Connection)
See the Connection topic for additional information on Connection Profiles.
Click Next to continue.
Step 6 – The Summary page displays all the selected query configuration settings. To make changes, click Back to navigate to the relevant wizard page. Click Finish to complete the configuration process.
Step 7 – A Confirm dialog box opens. Click Yes to run the query now or No to run the query at another time.
Both options close the Host Discovery Wizard and return to the Host Discovery Queries view on the Host Discovery node. If Yes is selected, the Query State indicates the running query.
Scan IP Network
Follow the steps to create a Host Discovery query using the Scan your IP network source option. This option scans a specified range of IP Addresses for active hosts and resolves the names of machines using DNS.
Step 1 – Open the Host Discovery Wizard. On the Source page, select the Scan your IP network option. Click Next.
Step 2 – On the Query page, name the query and select the credentials used to access the source.
-
Query Name – Provide a unique descriptive name for this query by typing over the
NEWQUERYdefault name. Two queries cannot have the same name. If you use an existing name, a number is automatically appended to the query name, for exampleNEWQUERYbecomesNEWQUERY1. -
Credentials – Select a Connection Profile. These credentials require the appropriate permissions for querying the source:
- Default credentials (credentials the application is run with) – Applies the credentials used to launch the Enterprise Auditor application
- Credentials in my default connection profile – Applies the default Connection Profile configured at the global level (Settings > Connection)
- Credentials in this connection profile – Use the dropdown list to select a Connection Profile from those preconfigured at the global level (Settings > Connection)
See the Connection topic for additional information on Connection Profiles.
Click Next to continue.
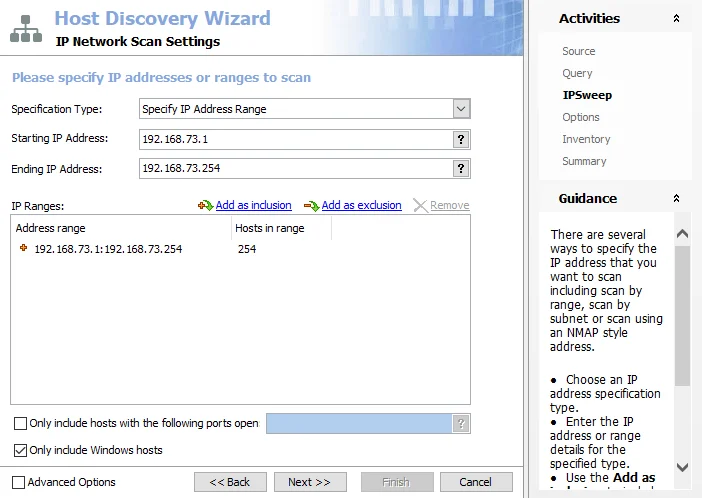
Step 3 – On the IPSweep page, specify the range of IP Addresses to scan.
-
Specification Type – Specify the type of IP range to scan. The selected Specification Type determines the IP Address options available for specifying the IP range. The default is Specify IP Address Range, but the following options are available:
- Specify Windows IP Configuration Information – Provide Hostname or IP address and Subnet mask values
- Specify IP Address Range – Provide Starting IP Address and Ending IP Address
- Specify Advance IP Address Range – Provide IP Address Range
-
IP Address options – The help [?] button at the end of each textbox provides example formats
- Hostname or IP address – Example:
192.168.2.35ortarget.example.com - Subnet mask – Example:
255.255.255.0 - Starting IP Address – Example:
192.168.2.1 - Ending IP Address – Example:
192.168.2.255 - IP Address Range – Example:
192.168.2.* - See the help button for full list of examples
- Hostname or IP address – Example:
-
IP Ranges box – Displays the selected range of IP Addresses. Use the links at the top of the box to edit the list:
- Add as inclusion – Adds information provided in the IP Address Textboxes into the to be collected list
- Add as exclusion – Adds information provided in the IP Address Textboxes into the to be ignored list
- Remove – Removes the selection from the IP Ranges box
-
(Optional) Only include host with the following ports open – If selected, this option limits the Host Discovery query to return only the hosts found in the IP Sweep with the specified open ports. When specifying multiple ports, separate them with commas or semicolons but not spaces. For example, to specify ports 10 and 80 enter:
10,80. The help [?] button at the end of the textbox provides example entry formats. -
(Optional) Only include Windows hosts – If selected, this option limits the Host Discovery query to return only the hosts found in the IP Sweep that have Windows operating systems
Click Next to continue.
Step 4 – On the Options page, configure the query options as required.
-
Run the query when jobs that reference it are run – Select this option to automatically execute the Host Discovery query prior to executing a job that has the host list generated by this query assigned. This ensures any new hosts have been discovered and are available for auditing.
RECOMMENDED: Use this setting only for host lists tied to specific jobs that require up-to-date host lists.
-
Query Result Retention – Select how to maintain the host list generated by this discovery query:
- Yes, grow the host list by appending newly discovered hosts – The host list includes every host the query has ever discovered
- No, only show hosts that were found during the most recent run – The host list generated by this query includes only hosts found in the most recent query execution. This option removes hosts from the generated host list, but does not remove hosts from the Host Master Table.
Click Next to continue.
Step 5 – On the Inventory page, the host inventory process can be automatically included with the discovery query.
-
Refresh inventory every time when the host discovery query completes – Automates the host inventory process and is dependent on the Settings > Host Inventory node configuration for the age of previously inventoried records. Leaving this option deselected applies the global settings for host inventory.
-
Credentials – Select a Connection Profile. These credentials require the appropriate permissions for gathering inventory information from the discovered hosts:
- Default credentials (credentials the application is run with) – Applies the credentials used to launch the Enterprise Auditor application
- Credentials in my default connection profile – Applies the default Connection Profile configured at the global level (Settings > Connection)
- Credentials in this connection profile – Use the dropdown list to select a Connection Profile from those preconfigured at the global level (Settings > Connection)
See the Connection topic for additional information on Connection Profiles.
Click Next to continue.
Step 6 – The Summary page displays all the selected query configuration settings. To make changes, click Back to navigate to the relevant wizard page. Click Finish to complete the configuration process.
Step 7 – A Confirm dialog box opens. Click Yes to run the query now or No to run the query at another time.
Both options close the Host Discovery Wizard and return to the Host Discovery Queries view on the Host Discovery node. If Yes is selected, the Query State indicates the running query.
Host Discovery Wizard
The Host Discovery Wizard gives complete control over how hosts are discovered on the targeted network and which hosts are discovered.
Use the Host Discovery Wizard to create new queries. The wizard opens in the Results pane. Use any of the following methods in order to access the Host Discovery Wizard from the Host Discovery node:
- Select Create Query in the Activities pane
- Right-click the Host Discovery node and select Create Query from the pop-up menu
- Right-click anywhere in the Host Discovery Queries table and select Create Query from the pop-up menu

The first step in creating a Host Discovery query is to select the source where the query searches for hosts. Hosts are discoverable using one of the following options:
- Scan IP Network – Scans a specified range of IP Addresses for active hosts and resolves the names of machines using DNS
- Query an Active Directory Server (General) – Scans the default domain controller or a specified server for all computer objects, can be scoped
- Query an Active Directory Server (Discover Exchange servers) – Scans the default domain controller or a specified server but is scoped to return only computer objects sitting in the configuration container for Exchange servers
- Query an Active Directory server (Discover Domain Controllers) – Scans the default domain controller or a specified server but is scoped to return only machines which are domain controllers
- Import From a Local CSV File – Imports a host list from a specified CSV file
- Import From a Database – Imports a host list from a specified SQL Server database
NOTE: The Advanced Options checkbox in the lower-left corner is a legacy item and should not be selected.