Configure Advanced Audit Policies
You can configure advanced audit policies instead of basic domain policies to collect Logon Activity changes with more granularity.
Follow the steps to configure security options.
Using both basic and advanced audit policies settings may lead to incorrect audit reporting. To force basic audit policies to be ignored and prevent conflicts, enable the Audit: Force audit policy subcategory settings to override audit policy category settings option.
Step 1 – Open the Group Policy Management console on any domain controller in the target domain: navigate to Start > Windows Administrative Tools> Group Policy Management.
Step 2 – In the left pane, navigate to Forest: <forest_name> > Domains > <domain_name> >
Domain Controllers. Right-click the effective domain controllers policy (by default, it is the
Default Domain Controllers Policy), and select Edit from the pop-up menu.
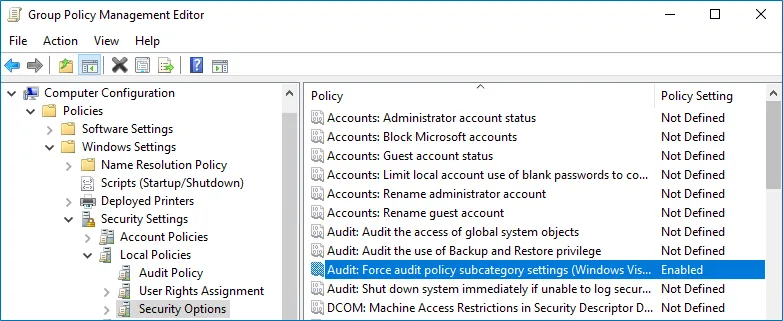
Step 3 – In the Group Policy Management Editor dialog, expand the Computer Configuration node on the left and navigate to Policies > Windows Settings > Security Settings > Local Policies > Security Options.
Step 4 – Locate the Audit: Force audit policy subcategory settings to override audit policy category settings and make sure that policy setting is set to "Enabled".
Step 5 – Navigate to Start > Run and type "cmd". Input the gpupdate /force command
and press Enter. The group policy will be updated.
Follow the steps to configure advanced audit policies.
Step 6 – Open the Group Policy Management console on any domain controller in the target domain: navigate to Start > Windows Administrative Tools> Group Policy Management.
Step 7 – In the left pane, navigate to Forest: <forest_name> > Domains >
<domain_name> > Domain Controllers. Right-click the effective domain controllers policy
(by default, it is the Default Domain Controllers Policy), and select Edit from the pop-up
menu.
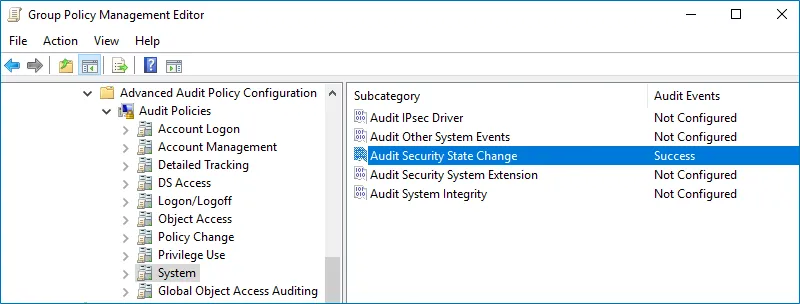
Step 8 – In the Group Policy Management Editor dialog, expand the Computer Configuration node on the left and navigate to Policies > Windows Settings > Security Settings > Advanced Audit Policy Configuration > Audit Policies .
Step 9 – Configure the following audit policies.
| Policy Subnode | Policy Name | Audit Events |
|---|---|---|
| Account Logon | - Audit Kerberos Service Ticket Operations - Audit Kerberos Authentication Service - Audit Credential Validation | "Success" and "Failure" |
| - Audit Other Account Logon Events | "Success" and "Failure" | |
| Logon/Logoff | - Audit Logoff - Audit Other Logon/Logoff Events | "Success" |
| - Audit Logon | "Success" and "Failure" | |
| System | - Audit Security State Change | "Success" |
Step 10 – Set the following advanced audit policies to "Success" and "Failure":
- Audit Kerberos Service Ticket Operations
- Audit Kerberos Authentication Service
- Audit Credential Validation
Step 11 – Set the Audit Security State Change advanced audit policy to "Success".
Step 12 – Navigate to Start > Run and type "cmd". Input the gpupdate /force command
and press Enter. The group policy will be updated.
Configure Basic Domain Audit Policies
Basic local audit policies allow tracking changes to user accounts and groups and identifying originating workstations. You can configure advanced audit policies for the same purpose too. See Configure Advanced Audit Policies
Step 1 – Open the Group Policy Management console on any domain controller in the target domain: navigate to Start > Windows Administrative Tools (Windows Server 2016 and higher) or Administrative Tools (Windows 2012) > Group Policy Management.
Step 2 – In the left pane, navigate to Forest: <forest_name> > Domains >
<domain_name> > Domain Controllers. Right-click the effective domain controllers policy (by
default, it is the Default Domain Controllers Policy), and select Edit from the pop-up menu.
Step 3 – In the Group Policy Management Editor dialog, expand the Computer Configuration node on the left and navigate to Policies > Windows Settings > Security Settings > Local Policies > Audit Policy.
Step 4 – Configure the following audit policies.
| Policy | Audit Events |
|---|---|
| Audit logon events | "Success" and "Failure" |
| Audit account logon events | "Success" and "Failure" |
| Audit system events | "Success" |

Step 5 – Set the Audit system events policy to Success.
Step 6 – Navigate to Start > Run and type "cmd". Input the gpupdate /force command
and press Enter. The group policy will be updated.
Configure Security Event Log Size and Retention Settings
Step 1 – Open the Group Policy Management console on any domain controller in the target domain: navigate to Start>Windows Administrative Tools (Windows Server 2016 and higher) or Administrative Tools (Windows 2012)> Group Policy Management.
Step 2 – In the left pane, navigate to Forest: <forest_name> > Domains >
<domain_name> → Domain Controllers. Right-click the effective domain controllers policy (by
default, it is the Default Domain Controllers Policy), and select Edit from the pop-up menu.
Step 3 – Navigate to Computer Configuration > Policies > Windows Settings > Security Settings > Event Log and double-click the Maximum security log size policy.
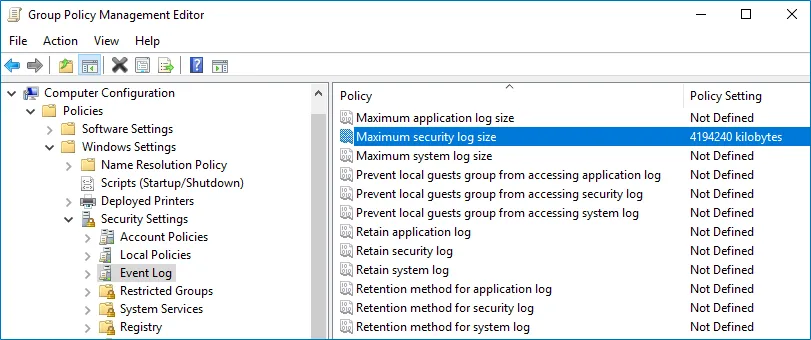
Step 4 – In the Maximum security log size Properties dialog, select Define this policy setting and set maximum security log size to*"4194240"* kilobytes (4GB).
Step 5 – Select the Retention method for security log policy. In the Retention method for security log Properties dialog, check Define this policy and select Overwrite events as needed.
Step 6 – Navigate to Start > Run and type "cmd". Input the gpupdate /force command
and press Enter. The group policy will be updated.
Configure Windows Firewall Inbound Connection Rules
For successful data collection, Netwrix 1Secure may have to create inbound Firewall rules. If you do not enable the Network traffic compression option, the product will try creating these rules automatically and will notify you it fails to do so. In this case, you have to configure Windows Firewall inbound rules manually.
Follow the steps to configure Windows Firewall Inbound Connection Rules.
Step 1 – On every domain controller, navigate to Start > Control Panel and select Windows Firewall.
Step 2 – In the Help Protect your computer with Windows Firewall page, click Advanced settings on the left.
Step 3 – In the Windows Firewall with Advanced Security dialog, select Inbound Rules on the left.

Step 4 – Enable the following inbound connection rules:
- Remote Event Log Management (NP-In)
- Remote Event Log Management (RPC)
- Remote Event Log Management (RPC-EPMAP)